1. Add & manage an application

Quickstart Guide – Application Management in QED space
An application in smartQED is any system for which you need to investigate and resolve problems. An application may consist of different physical components in which errors are observed when a problem happens.
QED Space offers a visual collaborative workspace to systematically explore and identify the potential causes for a problem in an application, along with other relevant information such as the symptoms (errors / anomalies) seen in the components, notes from collaborators, and actions that need to be taken to solve the problem or as preventive measures. Using QED Space increases your efficiency and reduces the time to resolve problems effectively.
Table of Contents
1. Create an Application
a. Login and click on Create Application
b. Specify your Application Name
c. Optionally add Component Names and Types, Hosts, and Technology Stacks
2. Configure an Application
a. Specify the Components
b. Enable /Disable Dynamic Anomaly Feature
c. Specify the Anomaly Categories
d. Manage Time Zone
e. Manage Fishbone Template
f. Customize Auto Report
g. Customize Fishbone Update Email Notification
3. Adding Collaborators
a. Add Collaborator’s Email, and optionally User Name, Display Name and Access Privilege
b. Update/ Remove Collaborator
4. More Operations
a. Changing Application Owner
b. Renaming and Deleting an Application
c. Pinning and Unpinning an Application
Below we show you the details of the above steps as performed in smartQED. We also provide some tips for advanced usage.
Step 1 – Create an Application
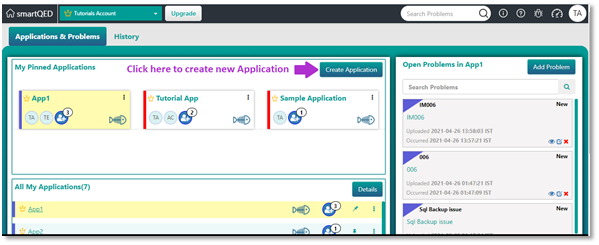
(a) Login and click on Create Application
For first time login to smartQED, Welcome to smartQED pop up is displayed.
Click on the Create Application link inside the pop-up. For subsequent logins to smartQED you will initially see the Applications Page below. Click on the Create Application Button as shown below with a purple arrow.
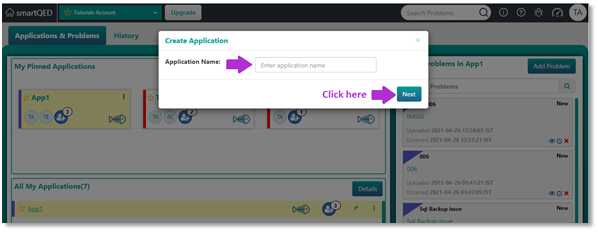
(b) Specify your Application Name
Type in the Application Name and click on Next.
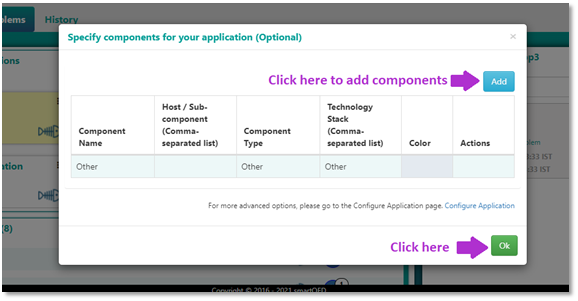
(c) Optionally add Component Names, Component Types, Hosts, and Technology Stacks
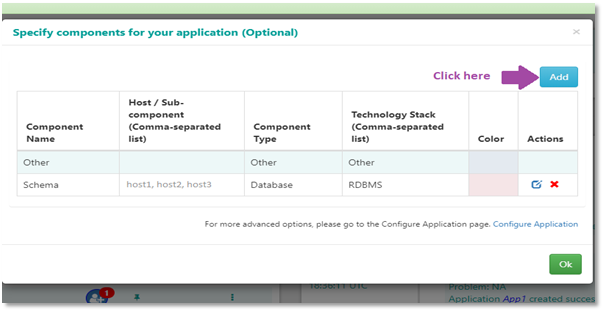
On clicking next, the Specify Components window is displayed, as shown below.
You can add additional components or click OK.
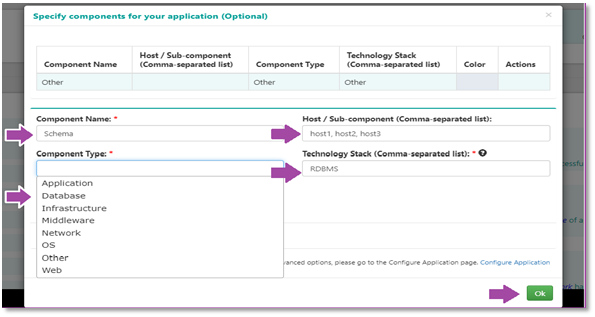
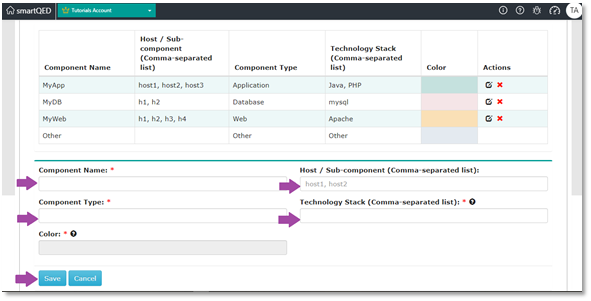
Type in the Component Name and select a Component Type from the drop-down List. Optionally add Host or Sub-components and then specify the Technology Stack – this provides the context for smartQEDrecommendations. Click on OK to save the information you entered.
If Hosts or Sub-components are entered in the optional field (hostnames must be separated by commas), they will be added to the problem fishbone as second level causes.
You can add more than one component by clicking on the Add button again.
An Application will be created with the newly added components, with you as the Owner of that application.
Step 2 – Configure an Application
The configuration process for each application specifies all the components, their types and the technology/software stacks associated with each. Only the Application Owner (Creator) has this privilege.
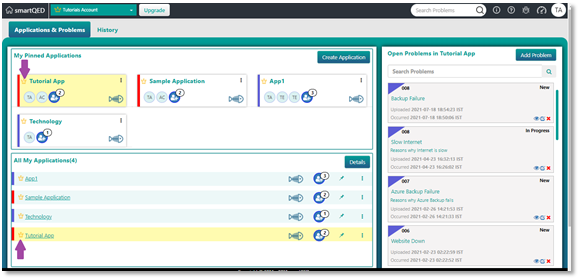
A gold crown next to the Application name on the list or in the App tile as shown below indicates that you are the Owner of that application.
(a) Specify the Components
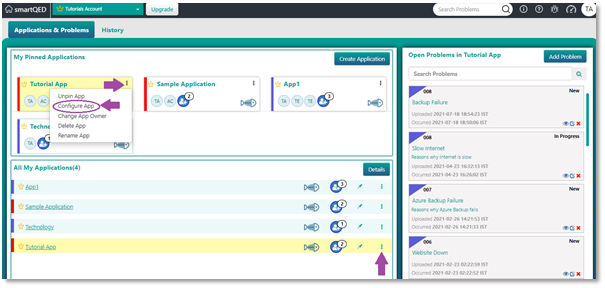
Click on the set of vertical ellipses in the App tile or next to the Application in the My Applications List. Choose Configure App from the drop-down list.
The Configure App page will be displayed, as shown below.
Enter the Components and Anomaly Categories for your application to get started. You can click on the Add New Problem button to enter a new problem.
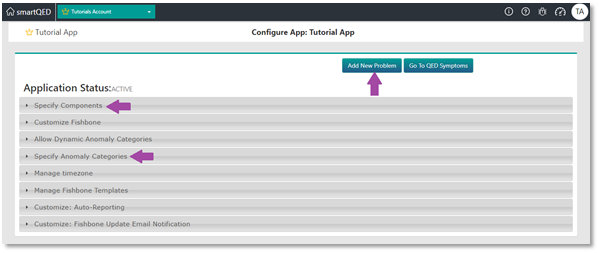
Click on Specify Component to drill down to the component details section. It displays all the existing components, as shown below. Click on Add button to add more components.
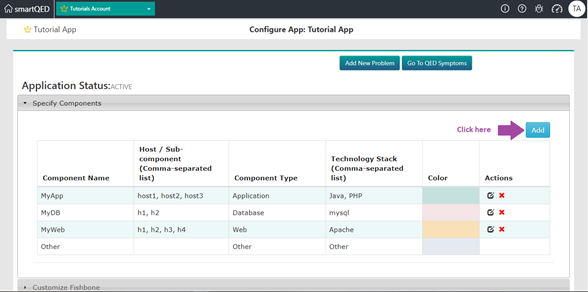
Enter the Component Name, Component Type, Host, and Technology Stack. Then click on Save.
While configuring any application we can enter one or more hosts in the Host/Sub-component field to add the sub-components as the second level sub-causes in a problem fishbone.
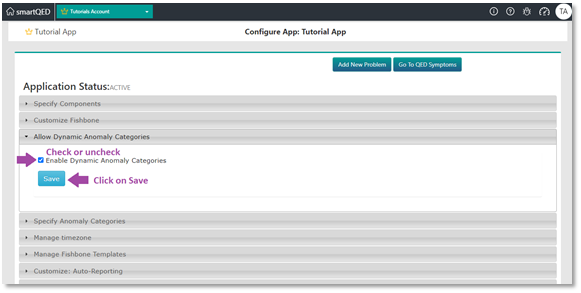
(b) Enable/ Disable Dynamic Anomaly Category
The checkbox for Enable Dynamic Categories is enabled by default. This option allows the user to add any new anomaly categories when adding a clue or a symptom for a problem.
Uncheck the box and click on Save if you do not want the user to dynamically enter a new anomaly category when adding a clue or a symptom for a problem.
(c) Specify the Anomaly Categories
Click on Specify Anomaly Categoriesto drill down to the Anomaly categories section. It displays all of the existing Anomaly Categories.
Click on Add button to add more Anomaly Categories.
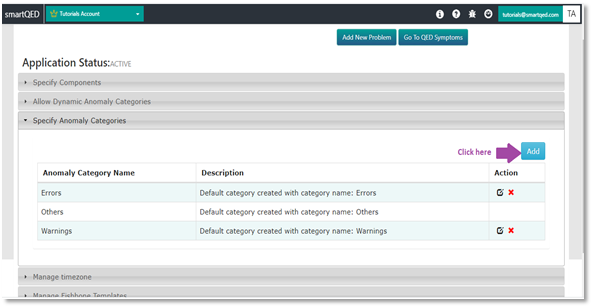
Enter an Anomaly Category Name and Description and click on Save.

(d) Manage Time Zone
Click on the Manage Time Zone section. The UTC time zone is displayed by default.
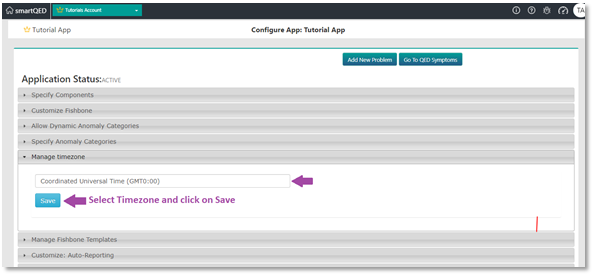
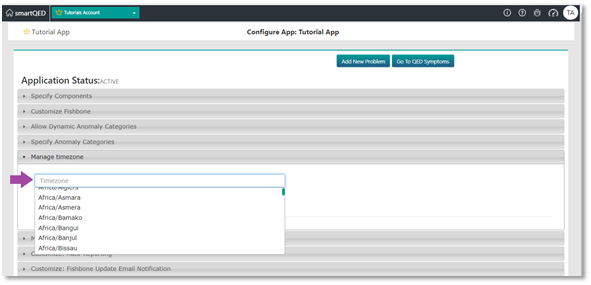
To select a different time zone, press the backspace key in the time zone field.
This displays a drop-down list of various time zones to choose from, as shown below.
Select the desired local time zone and click on Save.
(e) Manage Fishbone Templates
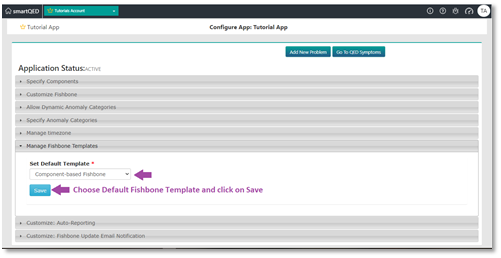
You can use this feature to select a default Fishbone template for all problems in an application. The Component-Based Fishbone is the system default in smartQED – it is created based on the components that you specified for your application.
Click on Manage Fishbone Templates section and then click on the drop-down to see a list of all the templates available in the application.
Choose the default template you want for the problems in your application and click on Save.
(f) Manage Auto Reporting:
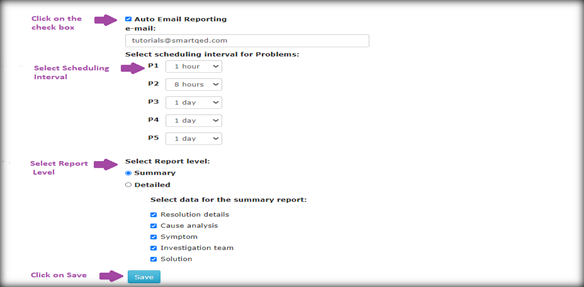
You can enable this feature to send Reports automatically at specific time intervals to one or more email addresses. The feature can be enabled for each specific application.
Click on the checkbox for Auto Email Reporting in the Customize Auto Reporting section.
Enter one or more emails (as a comma-separated list), the scheduling intervals based on the priorities of the problem, Report Level and click on Save.
Reports will be sent automatically to the specified email-ids at specific time intervals.
Uncheck the checkbox to disable Auto Email Reporting and click on Save.
(g) Customize fishbone update email notification:
The checkbox for Customize fishbone update email notification is enabled by default. This feature turns on the options of sending email to the collaborators when you update a fishbone.
Click on Customize fishbone update email notification section. Uncheck the checkbox to disable this feature.

Step 3 – Manage Collaborators
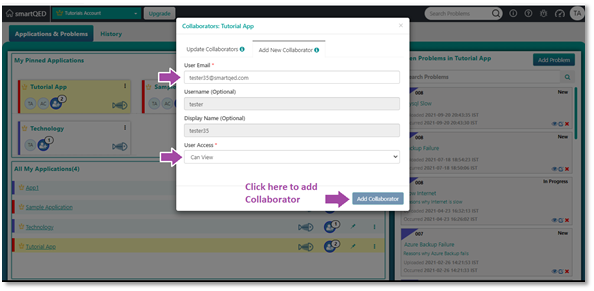
(a) Add Collaborator
Click on the Manage Collaborators button (head icon with a +) in the App tile or next to the application in the My Applications list. Click on the Add Collaborator tab to add a new collaborator for your application.
Enter the details for your new Collaborator and click on Add Collaborator as shown below.
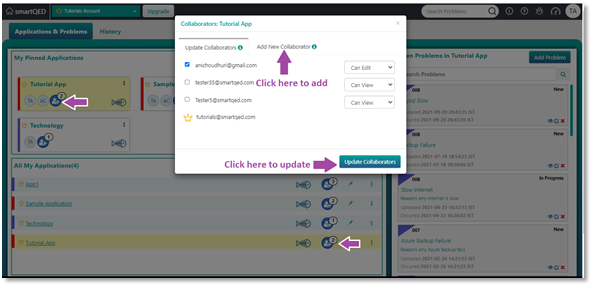
(b) Update/Remove Existing Collaborators
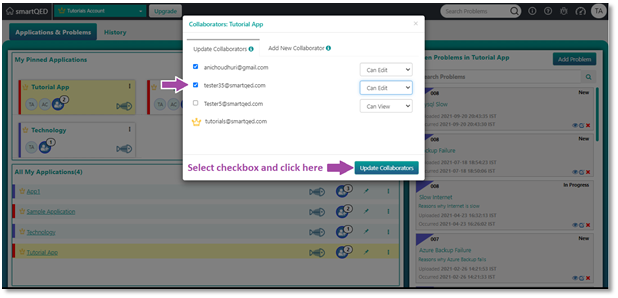
Click on the Update Collaborators tab.
Uncheck/check the checkbox next to an existing collaborator in the list to remove/add the existing collaborator.
Step 4 – More Operations
(a) Pinning and Unpinning an Application
Click on the pin symbol next to the application in the My Applications list.
This pins the Application in the App tiles area, as shown in the screenshot below.
Click on the unpin symbol next to an application to remove it from the pinned applications.
This unpins the Application from the App tiles area.

(b) Renaming and Deleting an Application
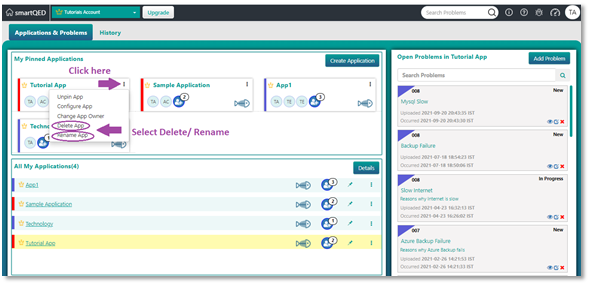
Click on the Vertical ellipses on the application tile and select Delete/ Rename as applicable.
(c) Changing Application Ownership
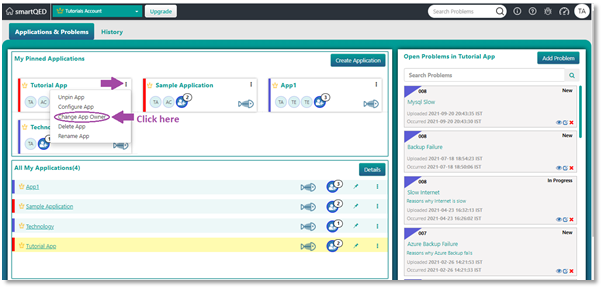
Click on the vertical ellipses on the application tile and choose Change App Owner.
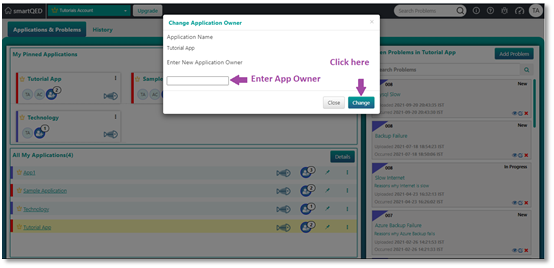
The Change Application Owner dialog box appears, as shown below.
Type in the name of the new App Owner and click on Change.
__________________________________________________________________________________
Hope you found this information useful. If you have any questions, please contact us at [email protected].
Please visit our website at https://smartqed.ai to get the latest news and blogs.